Log into the internet connected router ( We will call this the Main router ) . Select Wireless Bridge from the menu .
Place a checkmark next to Enable Wireless Bridging & Enable only specific Access Points to connect .
Enter the second Router or AP WLAN Mac address into the AP1 box . Select Apply Changes .
** NOTE **
When using Mac address filtering you must add the WLan Mac of the Router or AP into Main routers Mac Address filter allow list .
Select Security . Make a note of all settings .
Select Wireless > Channel & SSID . Make note of all the settings .
Log into second router or AP . When using WDS with a second router it must be set up as a Access Point .
Select Wireless > Channel & SSID . All settings must match the main router . Select Apply Changes .
Select Security . All settings must match the main router . Select Apply Changes .
Select Wireless> Wireless Bridge . Place a checkmark next to Enable Wireless Bridging & Enable only specific Access Points to connect.
Enter the WLAN Mac Address of the main router into the AP1 box . Select Apply Changes .
To test the WDS Link select Start > Run > cmd /k ping 192.168.2.254 /n 10 .
You Should get a dialog box which reads something like this:
Reply from 192.168.2.254: bytes=32 time=17ms TTL=64
Aside from searching the web, you download the trial version of
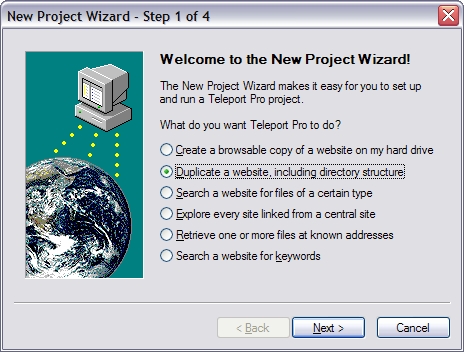
Teleport Pro Once installed from the menu bar select file/New Project Wizard
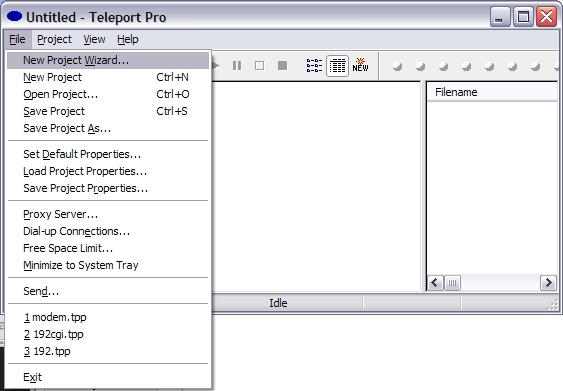
Select Duplicate a website, including directory structure.
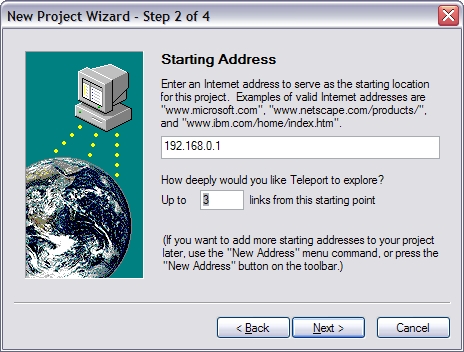
Enter the cable modem or router IP and select how many links deep you want to look.
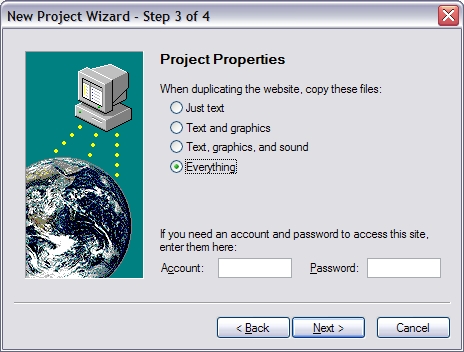
Select what you want and enter the username and password if needed.
Hit the finish button.
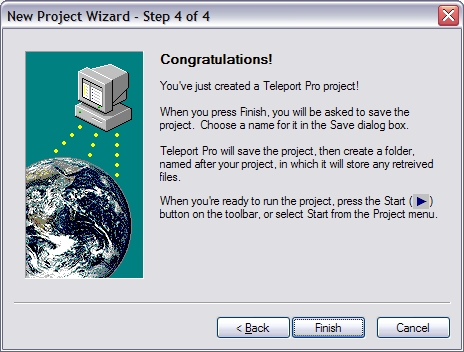
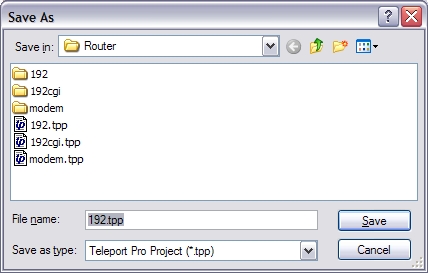
Save the project file. I created a desktop folder named "Router" and the program saved the website in a directory named 192 since I named the project file 192.
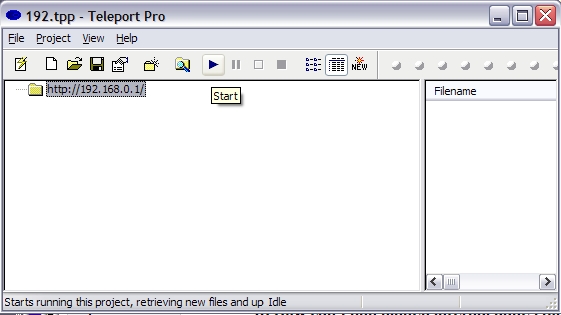
Hit the start button.
When it's done, go to the directory you sent the files to, in my case C:\Documents and Settings\nozero\Desktop\Router\192\192.168.0.1. Here is the list of files it found for my Netgear WGR 614:
C:\Documents and Settings\nozero\Desktop\Router\192\192.168.0.1\Detwan.cgi-WDect=Execute.htm
C:\Documents and Settings\nozero\Desktop\Router\192\192.168.0.1\DetWan.htm
C:\Documents and Settings\nozero\Desktop\Router\192\192.168.0.1\devices.cgi-refresh=Refresh.htm
C:\Documents and Settings\nozero\Desktop\Router\192\192.168.0.1\devices.htm
C:\Documents and Settings\nozero\Desktop\Router\192\192.168.0.1\diag.cgi
C:\Documents and Settings\nozero\Desktop\Router\192\192.168.0.1\diag.htm
C:\Documents and Settings\nozero\Desktop\Router\192\192.168.0.1\email.htm
C:\Documents and Settings\nozero\Desktop\Router\192\192.168.0.1\ether.htm
C:\Documents and Settings\nozero\Desktop\Router\192\192.168.0.1\form.css
C:\Documents and Settings\nozero\Desktop\Router\192\192.168.0.1\func.js
C:\Documents and Settings\nozero\Desktop\Router\192\192.168.0.1\fw_serv.htm
C:\Documents and Settings\nozero\Desktop\Router\192\192.168.0.1\index.htm
C:\Documents and Settings\nozero\Desktop\Router\192\192.168.0.1\Interval.htm
C:\Documents and Settings\nozero\Desktop\Router\192\192.168.0.1\jsmsg.htm
C:\Documents and Settings\nozero\Desktop\Router\192\192.168.0.1\keyword.htm
C:\Documents and Settings\nozero\Desktop\Router\192\192.168.0.1\lan.htm
C:\Documents and Settings\nozero\Desktop\Router\192\192.168.0.1\liteblue.gif
C:\Documents and Settings\nozero\Desktop\Router\192\192.168.0.1\log.cgi-refresh=Refresh&clear=Clear Log&send=Send Log&email_on=0.htm
C:\Documents and Settings\nozero\Desktop\Router\192\192.168.0.1\log.htm
C:\Documents and Settings\nozero\Desktop\Router\192\192.168.0.1\logout.cgi.htm
C:\Documents and Settings\nozero\Desktop\Router\192\192.168.0.1\logout.htm
C:\Documents and Settings\nozero\Desktop\Router\192\192.168.0.1\m_access.htm
C:\Documents and Settings\nozero\Desktop\Router\192\192.168.0.1\menu.htm
C:\Documents and Settings\nozero\Desktop\Router\192\192.168.0.1\menublue.gif
C:\Documents and Settings\nozero\Desktop\Router\192\192.168.0.1\msg.js
C:\Documents and Settings\nozero\Desktop\Router\192\192.168.0.1\netgear.cfg
C:\Documents and Settings\nozero\Desktop\Router\192\192.168.0.1\password.htm
C:\Documents and Settings\nozero\Desktop\Router\192\192.168.0.1\pforward.htm
C:\Documents and Settings\nozero\Desktop\Router\192\192.168.0.1\pppoe.htm
C:\Documents and Settings\nozero\Desktop\Router\192\192.168.0.1\pptp.htm
C:\Documents and Settings\nozero\Desktop\Router\192\192.168.0.1\redbull.gif
C:\Documents and Settings\nozero\Desktop\Router\192\192.168.0.1\remotemg.htm
C:\Documents and Settings\nozero\Desktop\Router\192\192.168.0.1\routes.cgi-add=Add&edit=Edit&delete=Delete&select=-1.htm
C:\Documents and Settings\nozero\Desktop\Router\192\192.168.0.1\routes.htm
C:\Documents and Settings\nozero\Desktop\Router\192\192.168.0.1\s.htm
C:\Documents and Settings\nozero\Desktop\Router\192\192.168.0.1\s_status.htm
C:\Documents and Settings\nozero\Desktop\Router\192\192.168.0.1\schedule.htm
C:\Documents and Settings\nozero\Desktop\Router\192\192.168.0.1\security.htm
C:\Documents and Settings\nozero\Desktop\Router\192\192.168.0.1\settings.gif
C:\Documents and Settings\nozero\Desktop\Router\192\192.168.0.1\spacer.gif
C:\Documents and Settings\nozero\Desktop\Router\192\192.168.0.1\st_ddns.htm
C:\Documents and Settings\nozero\Desktop\Router\192\192.168.0.1\st_dhcp.htm
C:\Documents and Settings\nozero\Desktop\Router\192\192.168.0.1\start.htm
C:\Documents and Settings\nozero\Desktop\Router\192\192.168.0.1\stattbl.htm
C:\Documents and Settings\nozero\Desktop\Router\192\192.168.0.1\system.htm
C:\Documents and Settings\nozero\Desktop\Router\192\192.168.0.1\top.htm
C:\Documents and Settings\nozero\Desktop\Router\192\192.168.0.1\upgrade.htm
C:\Documents and Settings\nozero\Desktop\Router\192\192.168.0.1\upload.gif
C:\Documents and Settings\nozero\Desktop\Router\192\192.168.0.1\upnp.htm
C:\Documents and Settings\nozero\Desktop\Router\192\192.168.0.1\Utility-1.js
C:\Documents and Settings\nozero\Desktop\Router\192\192.168.0.1\utility.js
C:\Documents and Settings\nozero\Desktop\Router\192\192.168.0.1\wanstat.htm
C:\Documents and Settings\nozero\Desktop\Router\192\192.168.0.1\wireless.htm
C:\Documents and Settings\nozero\Desktop\Router\192\192.168.0.1\wiz_cfm.htm
C:\Documents and Settings\nozero\Desktop\Router\192\192.168.0.1\wiz_sel.htm
C:\Documents and Settings\nozero\Desktop\Router\192\192.168.0.1\wtest_d.htm
C:\Documents and Settings\nozero\Desktop\Router\192\192.168.0.1\wtest_l.htm
C:\Documents and Settings\nozero\Desktop\Router\192\192.168.0.1\back_cfm.htm
C:\Documents and Settings\nozero\Desktop\Router\192\192.168.0.1\backup.htm
C:\Documents and Settings\nozero\Desktop\Router\192\192.168.0.1\Basic-1.htm
C:\Documents and Settings\nozero\Desktop\Router\192\192.168.0.1\basic.htm
C:\Documents and Settings\nozero\Desktop\Router\192\192.168.0.1\basictop.htm
C:\Documents and Settings\nozero\Desktop\Router\192\192.168.0.1\blank.htm
C:\Documents and Settings\nozero\Desktop\Router\192\192.168.0.1\bpa.htm
C:\Documents and Settings\nozero\Desktop\Router\192\192.168.0.1\browser.js
C:\Documents and Settings\nozero\Desktop\Router\192\192.168.0.1\darkblue.gif
C:\Documents and Settings\nozero\Desktop\Router\192\192.168.0.1\ddns.htm
The Virtual Servers function will allow you to route external (Internet)
calls for services such as a web server (port 80), FTP server (Port 21),
or other applications through your Router to your internal network.
If your application is not listed, you will need to
contact the application vendor to find out which port settings you need.
Choose the application from the drop-down list. Click Add. The
settings will be transferred to the next available space in the screen.
Enter the IP address in the space provided for the internal (server) machine
Click Apply Changes to save the setting for that application.
To remove an application, select the number of the row that you want to
remove then click Clear.
Manually Entering Settings into the Virtual Server
To manually enter settings, enter the IP address in the space provided
for the internal (server) machine, the port(s) required to pass, select the
port type (TCP or UDP), and click Apply Changes. Each inbound port
entry has two fields with 5 characters maximum per field that allows a
start and end port range, e.g. [xxxxx]-[xxxxx]. For each entry, you can
enter a single port value by filling in the two fields with the same value
(e.g. [7500]-[7500] or a wide range of ports (e.g. [7500]-[9000]). If you
need multiple single port value or mixture of ranges and a single value,
you must use multiple entries up to the maximum of 20 entries (e.g.
1. [7500]-[7500], 2. [8023]-[8023], 3. [9000]-[9000]). You can only pass
one port per internal IP address.
This is because the router is using a NAT firewall and the computers on the router are behind this firewall. You can fix it but only one computer is able to go on the other side of the firewall to play an Internet game or videoconference at a time. To do this you will need to use the DMZ settings in the router set up screen. First you will need to find out the IP address of the computer you want to put in the DMZ. In Win95/98 and ME click on Start and click on Run. Here type "winipcfg" and push Enter. This will bring up the IP configuration screen. In the drop down box choose the network card that you are using with the router. Here it should give you an IP in the 192.168.2.xxx range. Remember or write down that IP address and close the IP config window. In Win2000 and Win XP click Start go to Program and to Accessories. In there choose Command Prompt and type IPCONFIG at the DOS prompt. Remember or write down that IP address and close the IP config window. Now open you Internet browser and put in the router IP address, it should be 192.168.2.1, in the address bar. Log into the router and from the main screen click on Initial setup off to the left. On the next screen choose DMZ. Here you will need to click enable and type in the last digits of the IP address you just recorded earlier into the box there. Click the Enter button at the bottom to save that setting. You should now be able to use videoconferencing and Internet games. Remember to come back into the Router setup screen and disable the DMZ so that your computer can once again be put behind the firewall so it can be protected.


